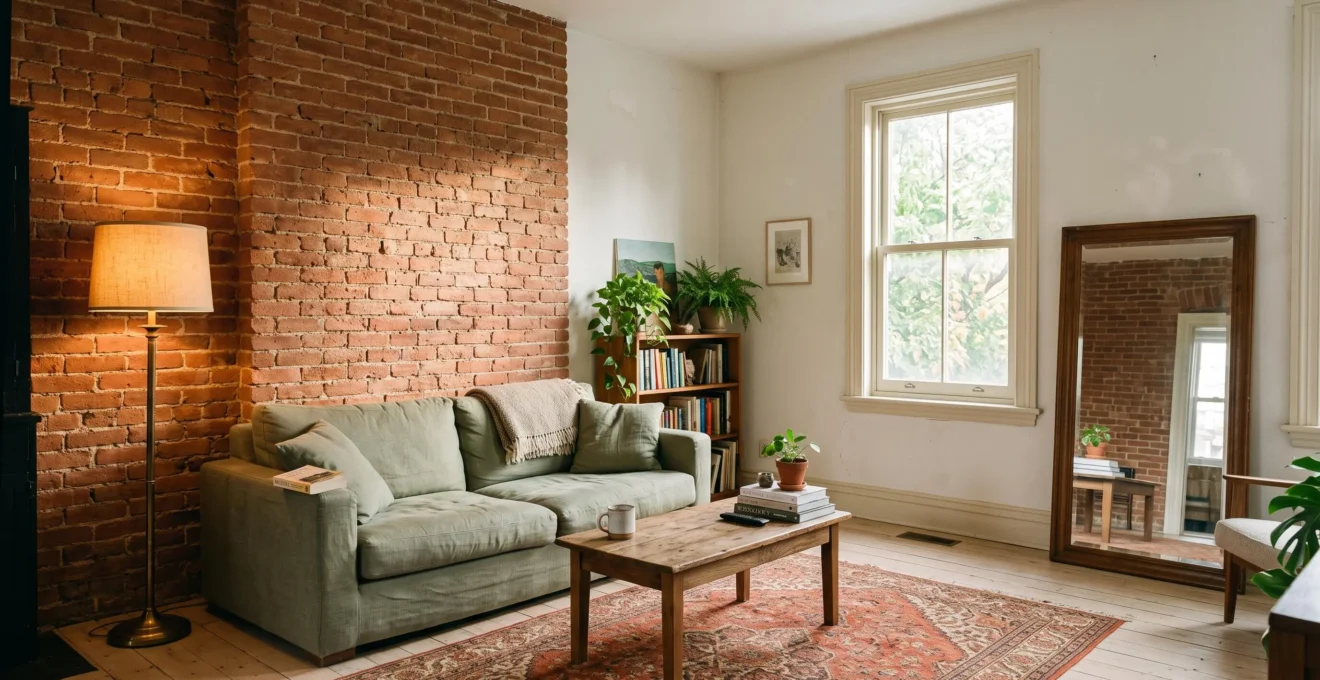
Exposed brickwork can give a residential interior a sense of permanence, texture and architectural history. Yet removing plaster does not automatically create an attractive feature wall. Dark brick can reduce the light available in a room, old mortar can release dust, and mismatched repairs may leave the surface looking unfinished rather than deliberately preserved.
The most successful approach is to treat brick as both a building material and a visual feature. Its condition, moisture behaviour and original construction matter just as much as the colours chosen for the surrounding walls.
To keep exposed brickwork without making a room feel gloomy, start by assessing the available daylight and the wall’s condition. Then choose complementary paint colours, balance the brick with lighter materials, and plan suitable lighting. Where the masonry is sound but visually overwhelming, a compatible limewash may offer a softer alternative to leaving every brick untreated or covering it with opaque paint.
Above all, distinguish between imperfections that contribute character and defects that require repair. That distinction determines whether exposed brick becomes a lasting architectural asset or a maintenance problem.
Exposed brickwork: the essentials
- Keep dark brick visually balanced with pale surrounding surfaces, carefully positioned lighting and furniture that introduces contrast without competing with the wall.
- Inspect moisture, mortar, cracking and previous treatments before leaving brick exposed or applying paint, limewash or sealers.
- Finish cleaning and repairs before decorating, and test colours and materials under the room’s actual daylight and evening lighting.
- Why Can Exposed Brick Make Some Rooms Feel Smaller or Darker?
- How Can You Match Paint and Furniture to Red or Brown Exposed Brick?
- Natural or Painted Brick: Which Works Better for an Interior Feature Wall?
- What Problems Should You Check Before Leaving Internal Brickwork Exposed?
- When Should You Decorate Around Newly Exposed Brickwork?
- Which Industrial Design Choices Can Make a Room Feel Too Dark?
- Light or Dark Wall Paint: Which Works Better in a Small Living Room?
- How Can You Choose Surface Finishes That Suit Both the Material and the Room?
Why Can Exposed Brick Make Some Rooms Feel Smaller or Darker?
Exposed brick can make a room feel darker because its colour, texture and surface reflectance change how daylight spreads through the space. Replacing pale plaster with darker masonry removes a potentially reflective surface. In smaller rooms, this reduction in reflected light, combined with a visually prominent wall, may also make the interior feel more enclosed.
Brick’s rough surface scatters incoming light in different directions, while its pigments determine how much light is reflected or absorbed. A deep brown brick generally behaves differently from pale buff brick, but texture alone does not establish how much darker it will appear than painted plaster of a similar colour.
The U.S. Department of Energy guidance on building daylighting and interior finishes explains that the colours of walls, ceilings, floors and furniture influence lighting effectiveness. It also identifies surface characteristics, orientation, shading and ceiling height as relevant factors.
Wall placement changes the result. Brick perpendicular to a main window may reduce the amount of light reflected sideways into the room. A wall opposite the window receives more direct daylight under some conditions, making its texture more visible and potentially giving the space a sense of depth. However, the actual effect depends on window geometry and surrounding surfaces.
Before removing plaster, record the room in daylight and after dark. If possible, photograph it from the same position with consistent camera exposure settings before and after the work. This creates a useful visual comparison, although photographs cannot precisely measure light loss.
Next, identify whether the problem is primarily the brick’s colour or the loss of reflective plaster. Dark masonry may be balanced with lighting and pale furnishings. If exposing the wall substantially reduces useful reflected light, partial exposure or a lighter masonry finish may be more effective.
The aim is not to make every brick surface bright, but to preserve enough visual contrast and usable light for the room to remain comfortable.
How Can You Match Paint and Furniture to Red or Brown Exposed Brick?
Match paint and furniture to exposed brick by identifying its undertones, choosing a restrained supporting palette and repeating selected colours across the room. Warm off-whites, muted greens and natural wood often complement red or brown masonry. Rather than matching every surface to the brick, use lighter materials and one contrasting accent to maintain definition.
Examine the wall in natural daylight before selecting colours. Brick described simply as red may lean towards orange, pink or purple. Brown brick can contain warm rust tones, cooler violet notes or grey mortar that changes its overall appearance.
These differences influence which neighbouring finishes feel harmonious. Test several paint samples directly beside the masonry instead of relying on individual colour cards.
The following combinations provide practical starting points rather than fixed colour rules.
| Brick appearance | Supporting wall colours | Furniture and textile direction |
|---|---|---|
| Orange-red brick | Warm off-white, soft cream, muted sage | Pale oak, natural linen, olive or muted green accents |
| Pink or buff brick | Warm greige, soft taupe, subdued stone | Light timber, oatmeal fabrics, restrained charcoal details |
| Deep brown or purple-brown brick | Warm ivory, mushroom, light neutral grey with suitable undertones | Mid-tone timber, textured cream upholstery, muted brass accents |
Brilliant white can create a strong contrast against irregular red brick, making chipped edges and uneven joints more noticeable. That contrast is not inherently wrong, but a softer off-white may produce a calmer transition, particularly in older homes.
Furniture should connect the palette without duplicating the wall. A rug containing a small amount of terracotta can echo orange-red brick, while a sage sofa introduces an independent colour. Similarly, warm timber may repeat the brick’s undertone without adding another large red surface.
A useful arrangement is to let the masonry remain the main warm element, use pale colours on larger surfaces and introduce a limited contrasting shade through movable items.
Avoid selecting dark red upholstery, reddish flooring, orange curtains and rust-coloured rugs simply because they match the bricks. Too much repetition can flatten the individual character of the material.
Once the colour balance feels right, the next question is whether the brick itself should remain natural or receive a finish that changes its appearance.
Natural or Painted Brick: Which Works Better for an Interior Feature Wall?
Natural brick is usually the better choice when the masonry is sound, visually consistent and suited to the room’s light levels. Painted brick can work where repairs or mismatched colours create an unattractive surface, but painting is difficult to reverse. Limewash offers an intermediate option when reducing visual weight matters more than preserving the original brick colour.
Begin with the wall’s actual condition rather than photographs of other interiors. Attractive, well-preserved masonry may need only careful cleaning and appropriate mortar repairs. By contrast, brick hidden behind plaster may contain patched openings, inconsistent repairs or damaged surfaces never intended for display.
Then consider the room. A spacious, well-lit interior can often accommodate a darker feature wall. In a small north-facing room, even sound red brick may dominate the available light. Several exposed walls introduce still more texture and visual weight.
Three broad approaches can be compared before making an irreversible decision.
| Criterion | Natural brick | Painted or limewashed brick |
|---|---|---|
| Visual appearance | Preserves original colours, variation and irregularities | Opaque paint unifies colour; limewash can soften it while retaining variation |
| Best suited to | Sound, attractive masonry in a suitably lit room | Visually inconsistent masonry or rooms needing a lighter appearance |
| Maintenance considerations | May require mortar repairs or attention to surface dusting | Requires compatible preparation and future finish maintenance |
| Reversibility | Preserves more future treatment options | Many paint systems are difficult to remove; limewash also changes the original surface |
| Moisture behaviour | Depends on the wall construction and existing condition | Depends on coating permeability and compatibility with the masonry |
Limewash is particularly relevant to traditional masonry because an appropriate formulation can retain vapour permeability while reducing the intensity of a red wall. A colour wash may offer a similar visual effect, but its suitability depends on the actual product rather than its marketing description.
Historic England‘s advice on redecorating older homes cautions that some modern paints can be difficult to remove without damage and that inappropriate coatings may interfere with moisture movement in traditional masonry.
Paint should therefore be treated as a lasting material decision, not simply a quick decorating change.
Where the original brick is heavily patched, painting may create a more coherent interior. It can also help reduce visual overload when several masonry surfaces are exposed, provided the coating is appropriate for the wall.
For older solid walls, seek conservation-informed advice before applying an opaque coating. For any proposed treatment, test a representative area and review the dried finish in both daylight and artificial light.
Whatever finish is chosen, the condition of the underlying masonry must be addressed first. A more attractive surface will not correct hidden damp or deteriorating mortar.
What Problems Should You Check Before Leaving Internal Brickwork Exposed?
Before leaving internal brickwork exposed, inspect it for damp staining, salt deposits, structural movement, damaged mortar, previous coatings and concealed services. Check why the masonry was originally plastered, particularly in older homes. Cleaning or sealing before these problems are understood can conceal deterioration or make moisture-related defects more difficult to resolve.
Start with moisture. Look for persistent dark areas, tide marks near floor level, peeling surrounding finishes and white crystalline deposits on brick or mortar. Efflorescence can indicate that moisture has transported soluble salts through masonry, although the cause and significance require assessment.
Next, examine cracks, displaced bricks, bulging areas and loose joints. Small surface irregularities may be part of the wall’s history, but continuing movement or visibly distorted masonry warrants professional inspection before decorative work continues.
Older bricks can also be damaged by aggressive cleaning. Removing plaster mechanically or using unsuitable abrasive techniques may strip a brick’s outer surface, leaving it more vulnerable to dusting and deterioration.
The SPAB advice on repairing and treating old brick walls explains how moisture, salts, inappropriate repairs and abrasive cleaning affect traditional masonry. It identifies limewashing or replastering as possible responses to dusting caused by damaged brick surfaces.
Do not assume that a transparent sealer is automatically the safest solution. Some treatments form films that restrict evaporation. Older solid brick walls in particular may depend on compatible, vapour-permeable materials to manage moisture.
Also investigate what the plaster may be concealing. Chimney breasts can contain old flues or soot deposits, while partition walls may hide electrical wiring or plumbing. Party walls can have acoustic, fire-resistance and other performance requirements that alterations must not compromise.
Properties with protected historic status may require additional permissions. Requirements differ between countries and local jurisdictions, so consult the relevant authority where appropriate.
Five checks to complete before finishing exposed brick
- Document moisture indicators: photograph staining, salts and affected areas, producing a location-marked record for further assessment.
- Inspect masonry condition: note cracks, loose joints, damaged bricks and bulging, producing a repair and referral list.
- Identify previous treatments: record paint, soot, plaster remnants and suspected abrasive damage, producing a surface-condition inventory.
- Review hidden risks: identify likely service routes, chimneys and party-wall requirements, producing a list of items requiring qualified checks.
- Confirm treatment compatibility: review the wall construction and proposed cleaning, mortar and finish specifications with an appropriate professional, producing an agreed treatment plan.
A moisture meter may help identify areas needing investigation, but readings on masonry can be affected by salts and other material characteristics. They should not be interpreted as a standalone diagnosis.
Only after the wall is understood and any necessary remedial work is planned should the decorating sequence begin.
When Should You Decorate Around Newly Exposed Brickwork?
Decorate around newly exposed brickwork after stripping, cleaning and necessary repairs are complete, the masonry is sufficiently dry, and any applied treatments have cured according to their specifications. Install planned lighting and complete dusty work before introducing textiles or furniture. There is no universal waiting period because drying depends on moisture conditions, wall construction and materials used.
Freshly exposed brick may continue to release loose mortar particles and residual dust after the main demolition work. Cleaning, repointing or floor finishing can also create debris that settles on furniture and soft furnishings.
Work in a sequence that limits repeated cleaning and prevents newly finished surfaces from being damaged.
- Complete the masonry work. Remove loose debris using suitable methods, investigate defects, carry out necessary repairs and apply only compatible treatments where justified.
- Confirm drying and curing. Follow material-specific instructions and seek professional assessment if the wall shows signs of persistent moisture.
- Finish other dusty trades. Complete floor preparation, sanding and related construction tasks while surfaces and furnishings remain protected.
- Paint adjacent walls and ceilings. Apply the selected colours after testing their relationship with the finished brick.
- Install and adjust lighting. Set up wall lights, uplighters or picture lights before positioning furniture permanently.
- Introduce furnishings last. Bring in rugs, curtains and upholstered pieces once construction dust has been removed and the room is ready for use.
Lighting deserves particular attention because exposed masonry often changes how a room looks after sunset. A directional light can reveal the relief of brick joints, while a separate ambient source helps prevent strong pools of light surrounded by darkness.
Plan wiring before finishing the wall. Surface-mounted electrical fittings and visible cables may be visually appropriate in some interiors, but their installation still needs to meet applicable electrical safety requirements.
Be equally careful with shelving, televisions and radiators. A masonry wall is not automatically a suitable fixing surface for every load. Hidden services, brick condition, hollow areas and anchor specifications must be assessed before drilling.
Heavy fixtures generally require fixings selected for the actual masonry substrate and load, rather than assumptions based on the wall’s appearance. Professional installation is appropriate where failure could cause injury or substantial damage.
With the practical work complete, attention can shift to the cumulative effect of brick, metal, flooring and furniture on the room’s overall brightness.
Which Industrial Design Choices Can Make a Room Feel Too Dark?
Industrial interiors can become too dark when exposed brick is combined with multiple light-absorbing finishes, such as black metalwork, dark timber, charcoal paint and heavy leather furniture. Each material may work individually, but together they can create excessive visual weight. Keeping the ceiling pale and introducing reflective or lighter elements usually produces a more balanced result.
The problem is often accumulation rather than a single unsuitable choice. A red brick wall provides strong texture and colour. Add black shelving, a dark leather sofa, smoked glass and deep-stained flooring, and very little of the room contributes to a lighter overall appearance.
A practical balancing principle is to introduce a lighter or more reflective counterweight for each major dark element. This is a decorating guideline rather than a numerical lighting standard.
- Balance a dark brick wall with pale surrounding paint or a light-coloured floor.
- Pair black steel furniture with a light rug or upholstery.
- Use mirrors where they can reflect a useful light source or brighter part of the room.
- Introduce glass or reflective metal accents without creating uncomfortable glare.
- Keep the ceiling relatively light where preserving a sense of height is important.
Metal finishes can make a noticeable difference. Matte black fittings generally reflect little light towards the viewer, while polished steel, aged brass and copper can introduce brighter highlights. Their effect depends on finish, placement and illumination, so reflective metals should not be treated as substitutes for adequate lighting.
The ceiling is particularly important. Painting it dark may create an intentionally intimate atmosphere, but in a room already dominated by red or brown masonry, a pale ceiling is often more forgiving.
Consider keeping the exposed brick as the room’s main industrial statement, then choosing simpler contemporary furniture rather than reinforcing the theme through every object.
This balance matters even more in compact living rooms, where the colour of the remaining painted walls can have a disproportionate visual effect.
Light or Dark Wall Paint: Which Works Better in a Small Living Room?
Light wall paint is often the more practical choice in a small living room with exposed brick because it helps distribute available light and prevents the feature wall from competing with other dark surfaces. Dark paint can still work as a deliberate accent, especially where daylight is adequate and lighter ceilings, flooring and furnishings maintain contrast.
A pale wall finish typically reflects more visible light than a darker version of the same material and sheen. This can improve the distribution of daylight and artificial light, although the result depends on orientation, window size, obstructions and the reflectance of other surfaces.
Perceived spaciousness is more subjective. Some dark rooms feel enclosed, while others feel visually coherent and restful. Light colours do not guarantee that a room will appear larger, especially when proportions, clutter or poor lighting remain unchanged.
For a small living room with a single red brick feature wall, consider three factors before choosing paint.
- Daylight conditions: establish the direction of the windows, neighbouring obstructions and the areas that remain shaded.
- Visual focal point: identify whether the brick, fireplace, window or another architectural feature should attract attention first.
- Surface balance: assess the combined colours of the ceiling, floor, furniture and brick before selecting a wall shade.
A light warm neutral on the remaining walls is a versatile starting point. It provides separation from red masonry without the starkness that bright white can sometimes create.
A darker painted accent can be effective on another wall when the overall palette is controlled. In a particularly small room, however, introducing a second visually heavy surface may compete with the masonry rather than strengthen it.
Paint sheen also deserves testing. Matte finishes tend to disguise minor wall irregularities and produce softer reflections. Eggshell and satin can introduce more noticeable highlights and may offer different cleaning characteristics, depending on the product.
Higher sheen is not automatically better for brightness: glare and visible surface defects may offset the desired effect. Large samples viewed in real lighting conditions are more informative than a sheen label alone.
Once the paint strategy is established, the final step is to make sure every finish works with the underlying materials and the room’s everyday demands.
Key takeaways before choosing your final finishes
- Assess material compatibility separately from colour: a visually suitable treatment may still be inappropriate for traditional masonry.
- Let brick provide the dominant texture, and choose flooring, paint and furnishings that support it rather than introducing competing finishes.
- Test the complete palette under actual room lighting, including evening conditions, before approving permanent treatments.
How Can You Choose Surface Finishes That Suit Both the Material and the Room?
Choose surface finishes by considering how each material behaves, how much light the room receives and how the space is used. Traditional brick and lime-based materials may require vapour-permeable treatments, while painted walls can accommodate different sheens and cleaning requirements. A coherent palette uses texture, colour temperature and practical performance together.
Start with the exposed masonry. Its porosity, mortar composition and exposure to moisture influence which treatments are appropriate. A finish suited to a modern, dry brick partition may be unsuitable for an older solid external wall with a history of dampness.
Historic England’s technical guidance on masonry and moisture explains how traditional masonry accommodates moisture movement and how relatively impermeable coatings can restrict drying. It also describes how soluble salts can contribute to surface deterioration.
This does not mean that every coating will damage brick. It means that product selection should be based on the wall’s construction and condition, not solely on the desired appearance.
With the masonry treatment established, build a restrained visual palette. Let brick remain the primary textured surface, then introduce one secondary texture, such as timber or woven upholstery. Keep larger hard surfaces broadly compatible in colour temperature so that the room feels intentional.
For example, a warm red brick wall can sit comfortably beside pale oak, textured linen and soft cream paint. Polished metal or glass may provide a small reflective contrast. Adding heavily patterned stone, strongly grained dark timber and multiple contrasting metal finishes may make the same space appear unnecessarily busy.
Room function should narrow the choices further.
| Room | Main concern | Finish priorities |
|---|---|---|
| Living room | Light balance and comfort | Coordinated paint sheen, practical lighting, manageable brick dust |
| Hallway | Contact, scuffing and cleaning | Durable adjacent paint, appropriate masonry maintenance, accessible cleaning |
| Kitchen | Grease, splashes and cleaning frequency | Cleanable surfaces in splash zones, suitable protection and material compatibility |
| Bathroom | Humidity and direct wetting | Moisture management, ventilation and finishes specifically suitable for exposure conditions |
In kitchens, raw brick near cooking or washing areas can be difficult to clean because of its uneven surface. In bathrooms, exposing masonry demands particular care: a breathable finish alone does not provide waterproofing, and uncontrolled wetting should not be treated as a decorative issue.
Before approving the scheme, place large paint samples, timber samples and fabric swatches beside the brick. Compare them during daylight, on overcast days where practical, and under the intended evening lighting. Check whether the brick appears more orange, brown or muted as conditions change.
Record the preferred combination and confirm that every proposed material has an appropriate specification for its location.
Before ordering materials or applying an irreversible coating, assemble a small sample board, confirm the brick’s condition and test the chosen finish in an inconspicuous location. A careful trial is usually more useful than trying to correct an unsuitable finish after the entire wall has been treated.
How can you reduce dust from exposed brick without making it glossy?
First establish whether the dust comes from loose mortar, residues left after stripping or deteriorating brick surfaces. Gentle cleaning and compatible mortar repairs may help. Where historic brick is breaking down, limewashing or replastering may be more appropriate than applying a transparent coating. Do not choose a sealer solely because it is advertised as matte; its compatibility with the wall and moisture conditions matters more than sheen.
Can a single exposed brick wall work in a north-facing room?
Yes, although darker masonry may make a room with limited direct sunlight feel less bright. Keep the surrounding palette relatively light, assess the need for artificial lighting and avoid placing several large dark furnishings immediately beside the brick. If the room still feels too heavy, a compatible lighter masonry treatment may be worth considering.
Is it safe to expose brick behind an old fireplace?
That depends on the fireplace and chimney construction. Old flues, soot deposits, deteriorated mortar, concealed services and fire-safety requirements may all be relevant. Have the fireplace and chimney assessed by an appropriately qualified professional before removing finishes or using the fireplace. Decorative brick exposure does not establish that a fireplace or flue is safe to operate.
Should exposed brickwork be covered if white salt deposits keep returning?
Recurring white deposits may be efflorescence, indicating moisture movement carrying soluble salts. Rather than immediately painting or sealing over them, investigate the moisture source and the wall’s construction. Inappropriate coatings can restrict drying and may worsen deterioration in susceptible masonry. The appropriate repair depends on the cause of moisture and the condition of the bricks and mortar.
Can you achieve a polished exposed-brick interior without hiding irregular bricks?
Yes. A deliberate finish does not require uniform brick colour or perfectly straight mortar joints. Sound, stable irregularities can provide character when the wall is clean, necessary repairs are compatible and its boundaries meet adjacent finishes neatly. Consistent lighting, restrained furnishings and carefully detailed edges often make more visual difference than trying to conceal every variation in the masonry.