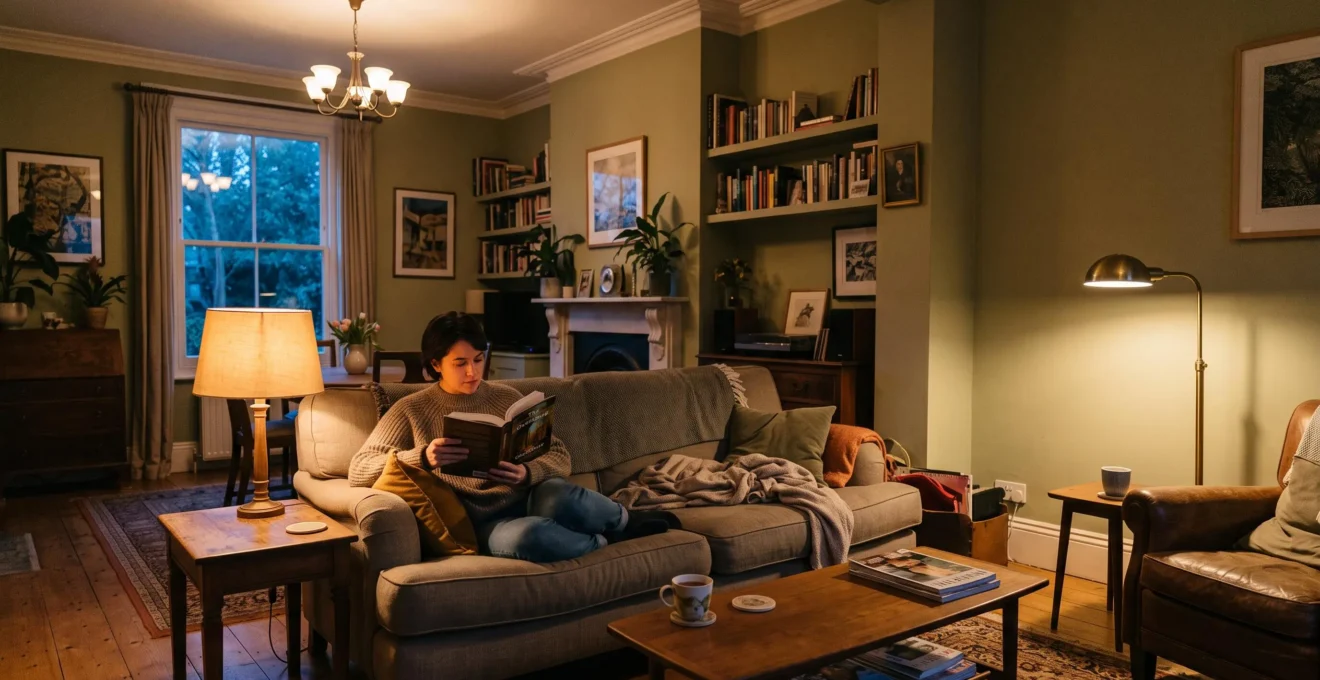
A room can feel perfectly bright when the ceiling light is switched on yet uncomfortable when someone tries to read on the sofa. Later that evening, the same fixture may seem too intense for relaxing, even with a softer bulb. The problem is often not how much light the room has, but where that light falls and how easily it can be controlled.
Effective interior lighting combines ambient, task and accent sources so different activities receive the illumination they need without making every corner equally bright. Ceiling fixtures establish general visibility, table and floor lamps illuminate specific activities, and carefully positioned accent lighting gives the room depth.
The most useful approach starts with how people actually use the space throughout the day. A kitchen that doubles as a dining area, a living room with a reading chair, or a bedroom with a small desk will each need different combinations. Once those activities are mapped, fixture placement, colour temperature and dimming controls can work together rather than compete.
Interior lighting essentials
- Combine ambient, task and accent lighting instead of relying on one powerful ceiling fixture.
- Place light where activities happen, checking for glare, unwanted reflections and shadows from seated positions.
- Give lighting layers independent controls so a room can shift between practical brightness and a softer evening atmosphere.
- Why Does One Ceiling Light Rarely Provide Enough Interior Lighting?
- How Can You Layer Ceiling, Table and Floor Lights Without Overlighting a Room?
- Warm or Cool Light: Which Works Better for Living Areas and Workspaces?
- Which Interior Lighting Mistakes Cause Glare and Harsh Shadows?
- When Should You Reconsider a Room’s Lighting Layout?
- How Can You Position Ceiling Lights for More Even Ambient Illumination?
- How Should You Position a Task Lamp Beside a Desk or Reading Chair?
- How Can Dimmer Switches Make One Lighting Scheme Work for Different Activities?
Why Does One Ceiling Light Rarely Provide Enough Interior Lighting?
One ceiling light rarely provides enough adaptable illumination because it lights the room from a single position rather than responding to different activities. Depending on its beam spread and placement, it may leave peripheral areas dim, create uncomfortable brightness directly beneath the fixture and cast shadows over work surfaces. A stronger bulb does not correct these distribution problems.
Consider a hypothetical living room with a ceiling pendant above the central coffee table. The table receives direct illumination, but the reading chair near a wall may remain relatively dark. Someone sitting at the table might find the pendant uncomfortably bright while another person struggles to read at the edge of the room.
Increasing the bulb’s brightness raises the light output from the same position. It may improve visibility in some areas, but the basic distribution remains unchanged, and the resulting contrast or direct glare may become more noticeable.
This distinction matters because lumens measure light output, not where that light reaches. Watts describe electrical power consumption. Neither figure, considered alone, establishes whether a room will be comfortably illuminated.
Professional lighting design therefore considers more than a single overall brightness target. The Illuminating Engineering Society research on lighting design objectives distinguishes overall ambient illumination from targeted illumination of particular surfaces and activities. Its proposed methodology emphasises how light is distributed across the room, rather than treating every visible surface identically.
A straightforward evening test can reveal whether a single-source arrangement is working:
- Switch on the ceiling fixture without supplemental lamps.
- Stand near the room’s corners and observe how visible the surrounding surfaces are.
- Sit where reading, working or food preparation normally happens.
- Check whether pages, work surfaces and faces receive adequate light without uncomfortable glare.
- Note which activity positions require changing posture or moving closer to the fixture.
The resulting weak spots identify where additional or repositioned sources would be more useful than greater overall brightness.
The next step is to assign separate lighting functions to the activities that genuinely need them, instead of illuminating the whole space more intensely.
How Can You Layer Ceiling, Table and Floor Lights Without Overlighting a Room?
Layer lighting by giving each fixture a distinct job and controlling the layers independently. Ceiling lights can provide general visibility, table or floor lamps can illuminate specific tasks, and accent sources can highlight selected features. Avoid overlighting by choosing which sources actually need to operate together rather than switching every fixture on at full brightness.
The three functional layers have different purposes:
- Ambient lighting: general illumination that makes it comfortable to move through and use a room, provided by ceiling fixtures, uplights or other broad-distribution sources.
- Task lighting: directed illumination for activities such as reading, writing, cooking or working at a desk.
- Accent lighting: selective illumination that draws attention to a shelf, textured wall or decorative feature and adds visual depth.
Begin with activity zones rather than fixture types. A sofa used for conversation may need gentle ambient lighting, while the same sofa used for reading benefits from a lamp aimed at the book. A dining table may need brighter illumination during a board game but a softer pendant during dinner.
In a hypothetical mixed-use living room, a ceiling fixture might provide background brightness while a floor lamp handles reading and a small table lamp gives a corner visual warmth. During reading, the floor lamp could operate with low ambient light. During cleaning, the ceiling fixture could provide stronger general illumination. There is little benefit in running every source at its maximum setting for both situations.
To avoid accumulating excessive light output, review the lumen ratings of the proposed bulbs and fixtures together. Their combined nominal output is a useful inventory, but it is not a reliable prediction of room illuminance: fixture optics, room size, surface reflectance and placement affect how much light reaches usable surfaces. Rather than using a universal lumen allowance, compare the planned distribution with the room’s actual tasks.
Controls need consideration before shopping. A house may have one ceiling-light switch and only a few convenient electrical outlets. Some sockets may already be linked to wall switches. This can make separately controlled layers awkward unless the wiring and furniture positions are considered in advance.
Plug-in lamps, remote-controlled bulbs and compatible smart plugs can offer flexibility without modifying fixed wiring. A qualified electrician may be needed if additional permanent circuits or switches are desired.
Once the light sources have clear roles, their colour temperature can be selected to distinguish practical work from a more relaxing atmosphere.
Warm or Cool Light: Which Works Better for Living Areas and Workspaces?
Warm light generally suits living areas intended for relaxation, while neutral or cooler light can be useful where clear task visibility is a priority. The best choice depends on what happens in the space, the surrounding materials and personal comfort. A multipurpose room can use both temperatures, provided neighbouring light sources form a coherent visual arrangement.
Light appearance is commonly described using correlated colour temperature, measured in Kelvin (K). Lower values produce a warmer-looking white with more yellow or amber character. Higher values produce a cooler-looking white.
The U.S. Department of Energy guidance on choosing efficient light bulbs associates 2700 K with warm residential illumination, 3000 K with soft warm light, 3500 K with a neutral appearance and 4100 K with cooler illumination commonly used in work-oriented environments. These are useful reference points, not mandatory settings for every household.
In a living room, warm light can reinforce the appearance of wood, upholstery and other materials associated with a comfortable evening setting. A desk or kitchen counter may benefit from neutral or cooler-looking lighting where visual detail matters, although colour temperature alone does not guarantee better visibility or concentration.
For an open-plan living and working area, the most dependable approach is to assign colour temperatures by activity zone. Warm lamps can serve the sofa and dining area, while a desk lamp provides a more neutral-looking task light. The transition feels more intentional when the two sources do not cast noticeably different colours over the same nearby surfaces.
A frequent mistake is placing a strongly cool bulb and a strongly warm bulb side by side, both illuminating the same wall. Rather than reading as separate functional zones, their contrasting colour patches can make the arrangement appear inconsistent. Choosing similar temperatures within each visual zone helps avoid this effect.
Adjustable LED lighting offers another option for rooms that change function during the day. The Department of Energy explanation of colour-tunable LED lighting distinguishes between dim-to-warm products, which become warmer as brightness decreases, and tunable-white products that can adjust colour temperature, sometimes independently of brightness.
These systems are particularly relevant when a dining table also functions as a workspace. The trade-offs are additional product cost, possible setup complexity and differences in control compatibility. For rooms with a consistent purpose, fixed-temperature lamps may be entirely sufficient.
Even a carefully selected light colour will feel uncomfortable when fixtures shine into people’s eyes or create hard shadows. Placement therefore matters as much as the bulb specification.
Which Interior Lighting Mistakes Cause Glare and Harsh Shadows?
Glare and harsh shadows usually result from exposed bright sources, poorly directed fixtures, reflective surfaces or light coming from an unsuitable angle. Common examples include visible bare bulbs at eye level, downlights positioned directly over seating and desk lamps casting shadows across paperwork. Shielding, diffusion and repositioning are often more effective than reducing every light’s brightness.
Direct glare occurs when a bright source enters the field of vision. A pendant with a visible bulb may be comfortable when someone stands beneath it but intrusive when viewed from the sofa. Similarly, a downlight positioned directly above a seated person’s face may create strong shadows beneath the eyes and nose.
Reflected glare is less obvious. A glossy dining table, mirror or computer monitor can reflect a fixture into someone’s eyes even when the original source is outside their direct line of sight.
Workstation guidance from the Occupational Safety and Health Administration explains that direct and reflected glare can interfere with visual comfort and screen visibility. Its recommendations include using diffused or shielded lighting, controlling fixture positions and adding task lighting where needed. This guidance specifically concerns computer workstations rather than residential lighting requirements.
For a home desk, it is worth examining the setup from the normal seated position at night. A lamp that looks attractive from across the room may appear as a bright reflection in the monitor when someone sits down to work.
Hand position also affects shadows. A right-handed person writing under a lamp placed on the right may cast a shadow across the notebook. Moving the lamp to the left often lets light reach the page without passing behind the moving hand. A left-handed writer can test the reverse arrangement.
Good glare control is usually a matter of directing light onto the activity while keeping the source itself out of view. A shade can conceal the bulb, a diffuser can soften an intense source, and a different fixture angle can remove a reflection without compromising task visibility.
Check multiple seating positions, including those facing a television or monitor. If glare appears only from one place, altering the light’s direction may solve the problem without changing the room’s general illumination.
Persistent glare after repositioning is also a sign that the lighting layout itself may no longer suit the room’s activities or furniture arrangement.
When Should You Reconsider a Room’s Lighting Layout?
Reconsider a room’s lighting layout whenever its activities, furniture positions or visual comfort requirements change. A new desk, relocated sofa, dining area or television can make formerly suitable light sources poorly positioned. Persistent glare, dim activity areas, awkward switching and the need for unusually bright bulbs are further signs that the layout deserves reassessment.
The most useful trigger is a change in how the room is used. A living room arranged mainly for conversation may have worked comfortably with a central ceiling fixture and a decorative lamp. Once one corner becomes a regular home office, the existing sources may no longer direct enough light onto the work surface.
Furniture movement can be equally important. Relocating a reading chair may place it outside a floor lamp’s useful beam. Moving a dining table can leave a pendant off-centre relative to the new seating arrangement. Adding a television may introduce reflections that were irrelevant to the previous layout.
Before purchasing new fixtures, distinguish between three possible problems:
- Distribution: useful light does not reach the right location, even when the room appears bright elsewhere.
- Visual comfort: reflections, exposed sources or shadows make an otherwise illuminated position unpleasant.
- Control: the existing fixtures could meet different needs, but they cannot be adjusted or switched independently.
These situations require different responses. A distribution problem may call for moving or adding a lamp. A glare problem may be resolved with a shade or altered aiming angle. A control problem may require a compatible dimmer or a separate switch rather than another source.
Assess the room after dark as well as in daylight. Natural illumination can conceal weak areas or reflections that become obvious once electric lighting carries the full load.
Five steps to audit your room’s lighting
- Draw a simple floor plan showing furniture and existing fixtures. Deliverable: a labelled room sketch.
- Mark where reading, cooking, working and relaxing occur. Deliverable: an activity-zone map.
- Test each position after dark and record weak illumination, glare or uncomfortable shadows. Deliverable: an observation list.
- Assign each issue a response: reposition, shield, supplement or improve control. Deliverable: a fixture-adjustment plan.
- Test a revised arrangement using movable lamps before committing to permanent installations. Deliverable: a working lighting setup or a concise list of remaining electrical changes.
This approach separates problems that can be corrected by moving a lamp from those that may genuinely require additional wiring or ceiling fixtures.
If the audit reveals widespread uneven background illumination, ceiling-light placement is worth examining next, while remembering that even ambient light is not the entire solution.
How Can You Position Ceiling Lights for More Even Ambient Illumination?
Position ceiling lights according to room dimensions, ceiling height, fixture beam distribution and the surfaces that need illumination. Several appropriately spaced sources can provide more even ambient coverage than one narrow central beam. However, fixture spacing should be assessed on a room plan and against actual beam characteristics rather than determined by a universal residential spacing formula.
Start by sketching the room’s boundaries and identifying fixed furniture, doorways and activity zones. Mark existing ceiling outlets before imagining new ones. A narrow corridor, square living room and open-plan kitchen will not benefit from identical fixture arrangements.
Beam angle affects how illumination spreads from each source. Narrow-beam fixtures concentrate light more tightly, while broader distributions cover larger areas but may create unwanted brightness in certain directions. Ceiling height influences the size of the illuminated area at the floor or work surface.
For several downlights, examine their coverage together rather than treating every fixture independently. Large gaps between their illuminated areas may leave uneven zones; excessive overlap can produce concentrated brightness. Manufacturer photometric information or a professional lighting layout can help when precise coverage matters.
Wall illumination is often as important as floor illumination. If the room’s perimeter remains dark, a bright central zone may feel disconnected from the surrounding space. Carefully positioned wall-washing fixtures or uplights can make vertical surfaces more visible without relying solely on stronger downward illumination.
Before altering ceiling wiring, consider whether the existing layout can be improved through a change of fixture. An adjustable fitting may redirect its beam towards an underlit area. A pendant with a broader diffuser may distribute light differently from a concentrated spotlight. In some rooms, an uplighter or appropriately installed indirect lighting can improve ambient coverage without new ceiling outlets.
Permanent lighting changes must also account for structural constraints, electrical safety and the applicable local installation requirements. Corded luminaires should be installed and routed in accordance with their instructions, without exposed or unsupported wiring.
Even well-spaced ceiling lights can make a room feel flat when they illuminate all surfaces at similar intensity. That may be practical for cleaning, but less appealing for a quiet evening. Ambient evenness is therefore a foundation, not the finished lighting design.
Once the room has an adequate ambient foundation, individual reading and working areas can receive precisely directed light without requiring the ceiling layer to become brighter.
How Should You Position a Task Lamp Beside a Desk or Reading Chair?
Position a task lamp so its light reaches the work surface or reading material without the bulb entering the user’s normal line of sight. At a desk, the lamp should avoid casting the writing hand’s shadow across the page. Beside a reading chair, place the lamp slightly behind or beside the sitter so light falls onto the book from above.
For a desk, begin by sitting in the normal working posture with the notebook, keyboard or other task material in its usual position. Adjust the lamp until the useful area is illuminated without a concentrated hotspot. The shade or lamp head should shield the bright source from the user’s eyes.
For writing, start with the lamp on the side opposite the dominant hand. A right-handed writer can try the left side, and a left-handed writer the right. The rule is a practical starting position rather than a universal requirement: lamp shape, arm movement and the exact task can change the best arrangement.
Check the result by writing a few lines and observing where the hand’s shadow falls. If it crosses the writing area, adjust the lamp’s lateral position, height or angle until the shadow moves away.
Computer-based tasks need a slightly different balance. A monitor emits its own light, while paperwork may need supplementary illumination. Direct the desk lamp onto documents rather than towards the display, and check the screen from the normal viewing position for reflections.
For a reading chair, sit comfortably with a book held at its usual height before placing the fixture. A useful initial arrangement places the bottom of the floor-lamp shade approximately around seated shoulder height, with the lamp beside or slightly behind the chair. The exact height depends on the shade, beam direction, book position and reader’s proportions.
The important test is whether light reaches the open pages evenly without shining directly into the reader’s eyes. If the lamp creates a small intense patch or leaves part of the book in shadow, adjust the head position or move the base slightly.
An adjustable arm or directional lamp head makes this easier. Desk depths, chair heights and personal reading positions vary, so a lamp that can move with the user is often more useful than one whose geometry is fixed.
Choose adjustability before perfect symmetry. Two identical lamps placed symmetrically may look balanced, but a single movable task lamp can serve an activity more effectively when positioned according to the user.
With each task source correctly positioned, the remaining improvement is to control how strongly the ambient and task layers operate together.
What to remember before choosing lighting controls
- Separate ambient, task and accent lighting into controllable groups wherever practical.
- Confirm whether existing switches and electrical outlets allow the desired combinations before purchasing controls.
- Choose dimming options that are explicitly compatible with the bulbs and fixtures already installed.
How Can Dimmer Switches Make One Lighting Scheme Work for Different Activities?
Dimmer switches make an interior lighting scheme more adaptable by changing the brightness of existing fixtures rather than requiring a separate set of lights for each activity. With compatible bulbs and independently controlled layers, the same room can provide stronger general illumination for cleaning or working and softer background light for dining or relaxing.
The most useful distinction is between dimming a room as a whole and controlling individual lighting functions. Reducing the brightness of one central ceiling fixture may make it less intense, but the room still receives light from the same direction. It does not necessarily improve a reading position or create the contrast associated with layered evening lighting.
Independent controls offer more flexibility. A ceiling fixture can provide brighter ambient illumination when general visibility matters, while a floor lamp can remain focused on a book. Later, the overhead source can be reduced or switched off while a warm table lamp provides a gentler background.
In a hypothetical living room, the same fixtures could support these different settings:
| Activity | Ambient lighting | Task or accent lighting |
|---|---|---|
| Cleaning | Brighter general illumination | Additional task light where needed |
| Reading | Low to moderate background light | Focused lamp beside the chair |
| Dining | Soft, comfortable illumination | Table lighting adjusted for the activity |
| Relaxing | Dimmed or reduced overhead light | Warm table or accent lamp |
Before purchasing a dimmer, check compatibility with the bulb or integrated LED fixture. An LED advertised as dimmable is not necessarily compatible with every dimmer mechanism. Inappropriate combinations can cause flickering, buzzing, abrupt changes or a restricted dimming range.
Manufacturer compatibility information should be checked for both the lamp and control. A suitable combination should also be tested through its useful dimming range. The Department of Energy’s guidance on efficient light bulbs specifically emphasises matching LEDs to compatible dimming systems.
For households that cannot or do not want to change permanent wiring, several control approaches are available. Compatible smart bulbs can provide brightness adjustment through an app, remote or supported voice-control system. Plug-in lamp dimmers can control suitable dimmable lamps, provided their specifications match the connected load. Existing wall dimmers may be retained when the fixtures and bulbs are compatible.
Smart controls are not interchangeable with every fixture or wall circuit, and some require particular switches, hubs or uninterrupted power. A permanent wall-dimmer installation may require a qualified electrician, depending on the electrical arrangement and local requirements.
The central advantage of dimming is not simply making a room darker. It is allowing light levels to follow the activities taking place while preserving illumination in the positions that still need it.
Start with one room and identify two familiar situations, such as working and relaxing. Adjust the existing lighting so each activity has adequate illumination without unnecessary brightness elsewhere, then record the settings that feel comfortable. These practical observations provide a stronger starting point for future fixture and control purchases than choosing every light independently.
Can a small room benefit from layered lighting?
Yes. Layering refers to the functions and control of light, not the number of fixtures. A small room might use a broad-distribution ceiling light for general illumination and one adjustable lamp for reading or working. Additional decorative lighting is optional if the existing sources already meet the room’s needs.
Do all lamps in a room need the same colour temperature?
No. Different activity zones can use different colour temperatures. Keeping neighbouring sources visually consistent usually produces a more coherent appearance, particularly when their beams overlap. A dedicated desk may use neutral light while nearby relaxation lighting remains warm.
Can renters improve interior lighting without changing ceiling wiring?
Movable table lamps, floor lamps and suitable plug-in controls can improve lighting distribution without permanent electrical alterations. Compatible smart bulbs may provide additional adjustment. Any installation should respect the product instructions, existing electrical arrangements and rental restrictions.
Is a brighter LED bulb always the best solution for a dark room?
No. Greater light output may help when overall illumination is genuinely insufficient, but it may not correct poor placement, reflected glare or shadows on work surfaces. First identify whether the issue is general brightness or the distribution of useful light.
What should be checked before replacing a standard switch with an LED dimmer?
Check whether the bulbs or integrated LED fixtures are dimmable, whether the proposed control is compatible with them, and whether the existing electrical circuit supports the installation. Manufacturer instructions are essential. Fixed-wiring changes should be handled by a qualified professional where required.